Last November, ChatGPT took the world by storm. Large Language Models (LLMs) have proven to be incredibly useful and helpful tools. Unfortunately, many organizations do not allow them to be used internally. This can greatly limit productivity within a company.
What if you could build a chat bot more powerful than ChatGPT3.5 that could only be accessed by people you invite and did not retain any inputs or outputs? Would this meet your companies compliance standard?
In this article, I will walk through the process to set up a stand alone LLM in under 20 minutes. I deploy the app in a cloud workspace that I control. I also add features to the app that allow for PDF, Word Documents, and/or txt files to be uploaded as part of the initial prompt to the model.
This article is broken down into three sections:
- Setting up an AWS Account to enable the Claude Anthropic Models (< $5 a month)
- Creating a Python Dash App as a user interface to the model (free)
- Deploying the LLM Dash App in a contained Posit Cloud environment (free)
Although this is meant to be a corporate solution, the product designed below is very inexpensive. An individual user can create this on their own and face no cost beyond the price to use the LLM model on AWS which shouldn’t be more than a few dollars a month depending on usage.
DISCLOSURE: This article is not sponsored or influenced by my employer. I am writing this as a hobbyist. The information in this article has not been validated by any secondary source. Please contact AWS, Anthropic, and/or Posit to answer any questions you may have about implementing this solution for your organization.
Step 1: Setting up an LLM on AWS
The AWS value proposition specifically addresses the concern that many organizations face: How to ensure LLMs can be used without exposing sensitive or confidential data. The Bedrock offering is designed to provide standalone LLMs that are secure and comply with organization policies. The models do not store or retain any inputs or outputs.
Read more about the security and compliance offered through AWS Bedrock even allowing for direct connection to VPCs. Despite the security in place, please speak with internal risk/compliance/legal before building a chat bot.
The steps below should take <20 minutes to complete and do not require a high tech bar to finish. Let’s get started… . The first thing you will need is an AWS account. You can register and create one for free, but you will need to provide payment information.
Once you are logged into the console, the next thing to do is enable the Claude models. AWS offers a series of LLMs through Amazon Bedrock. For this exercise we will use the models created by Anthropic.
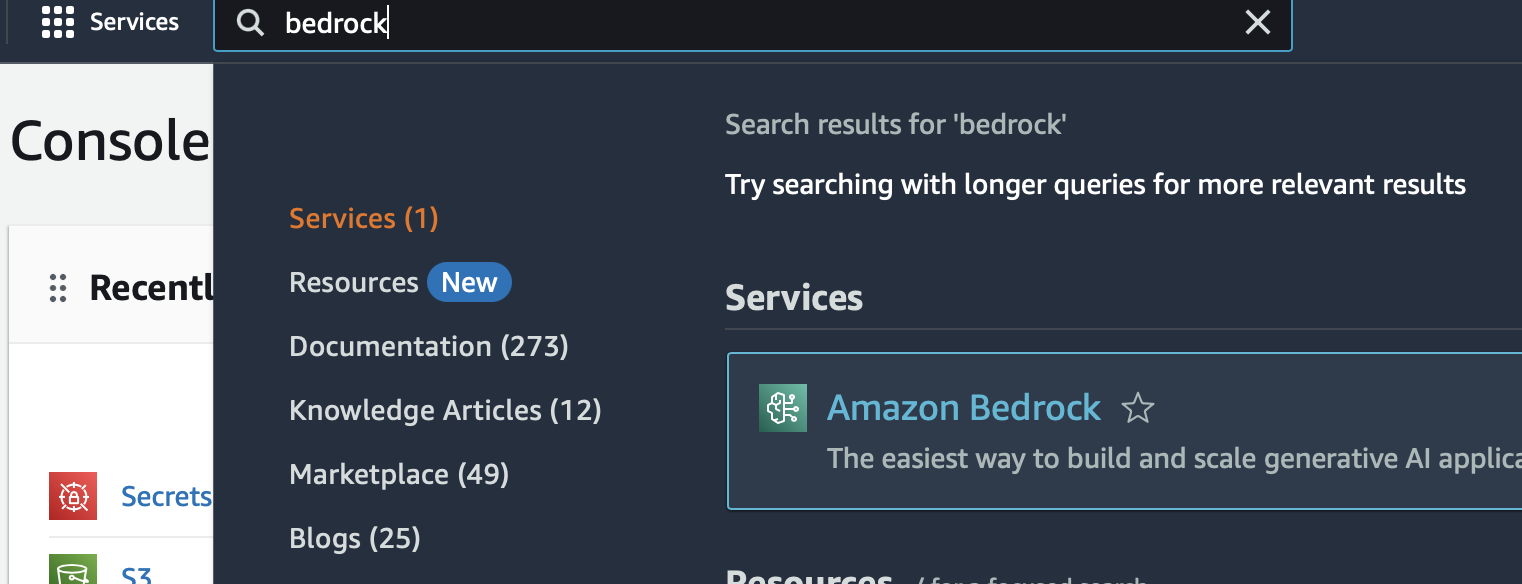
On the main screen, type “Bedrock” in the search bar and select Amazon Bedrock as shown.
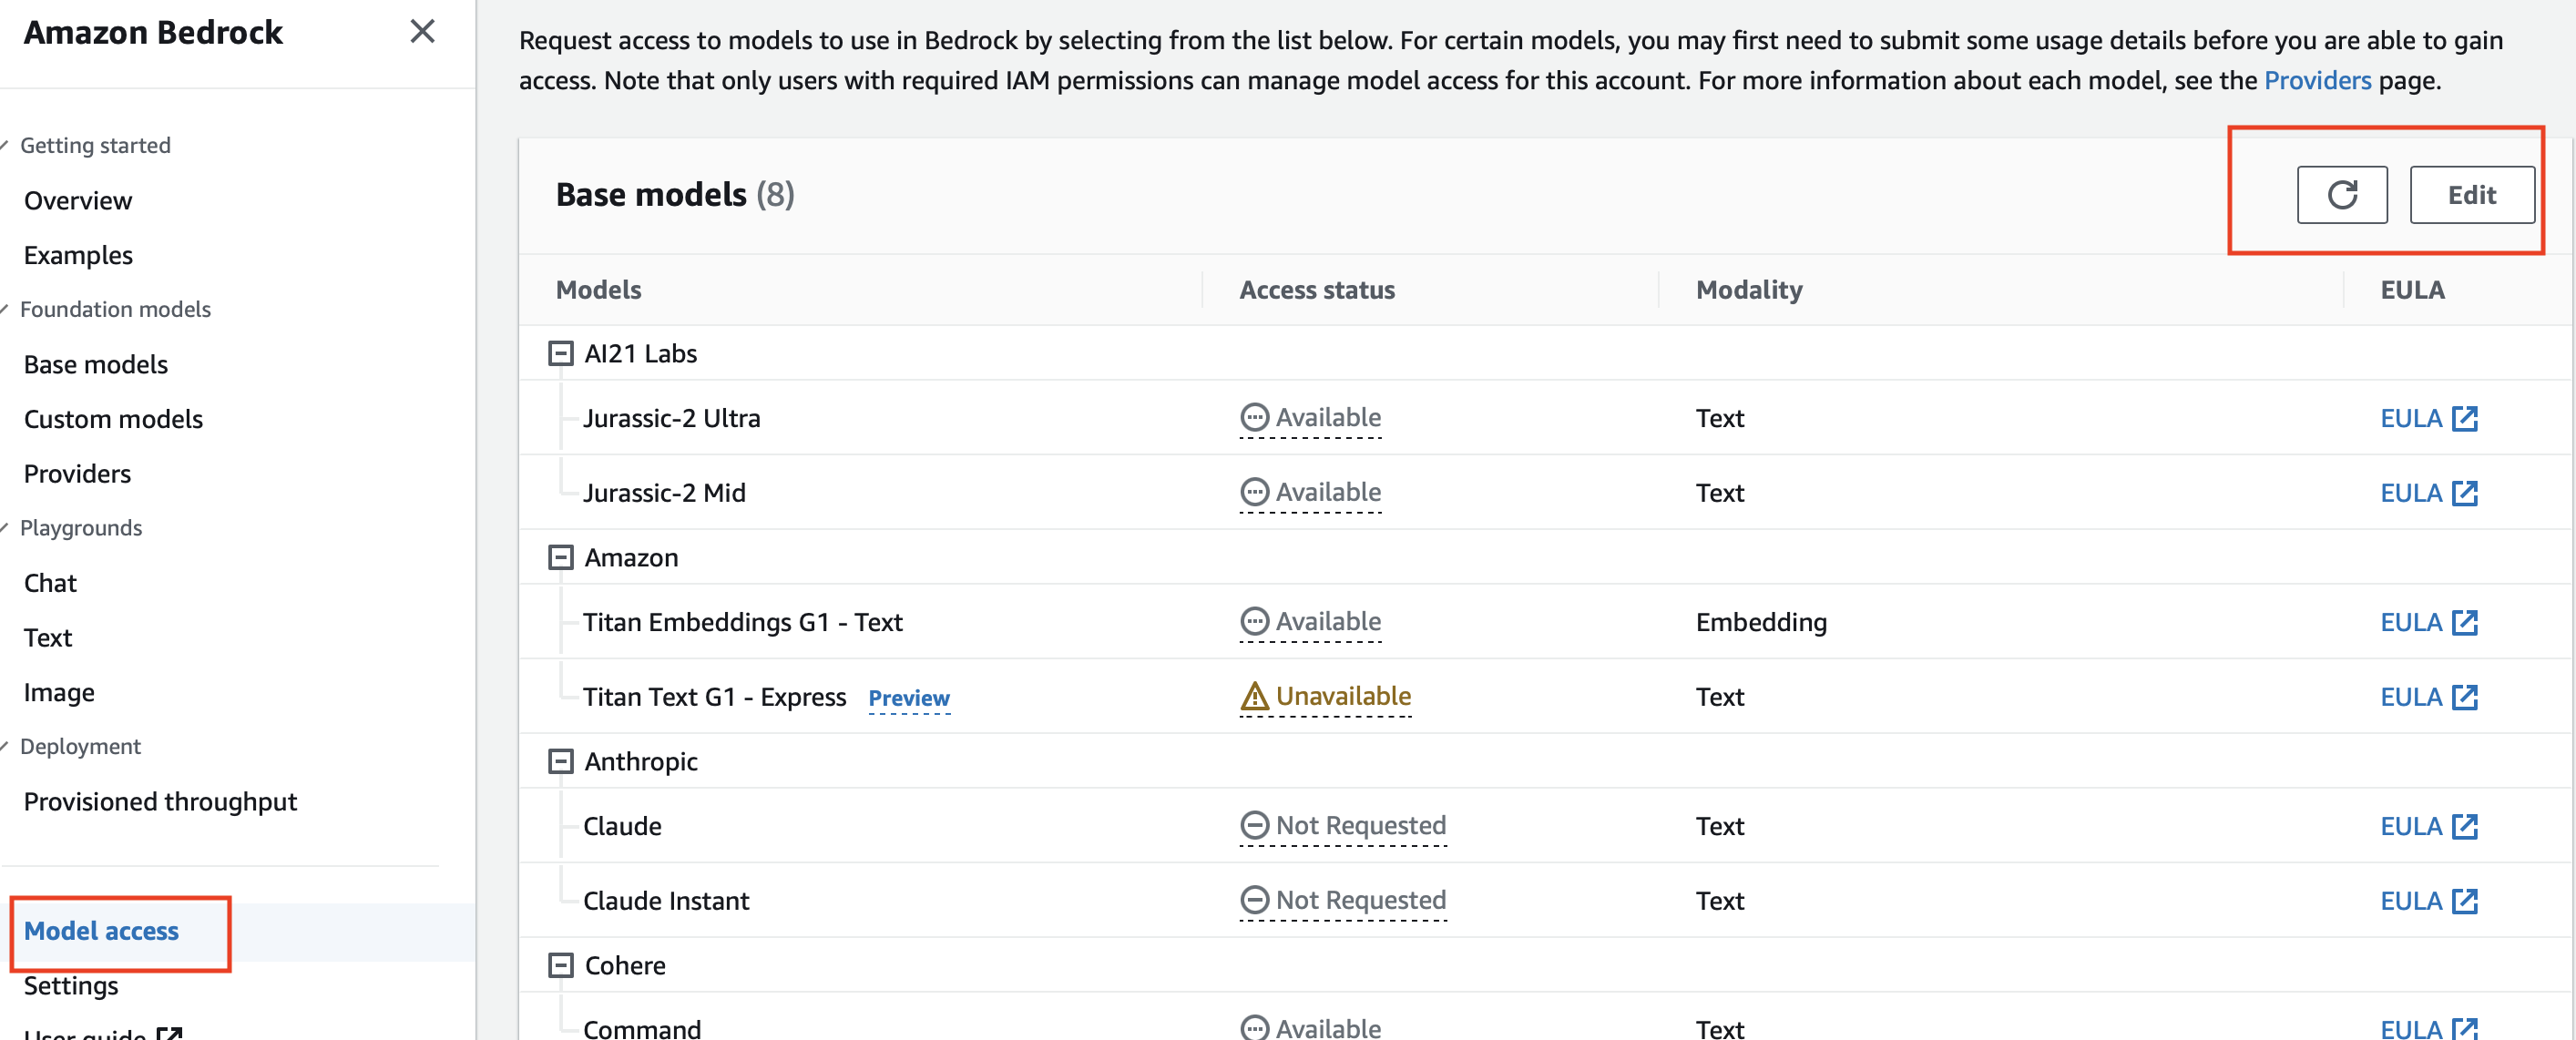
Next, click “Get Started”. On the left side panel, click “Model Access” near the bottom. Next click the “Edit” button in the top right corner.
Click “Request” next to the Anthropic models and you will see a pop up screen. Fill in the information that is accurate to your use case.
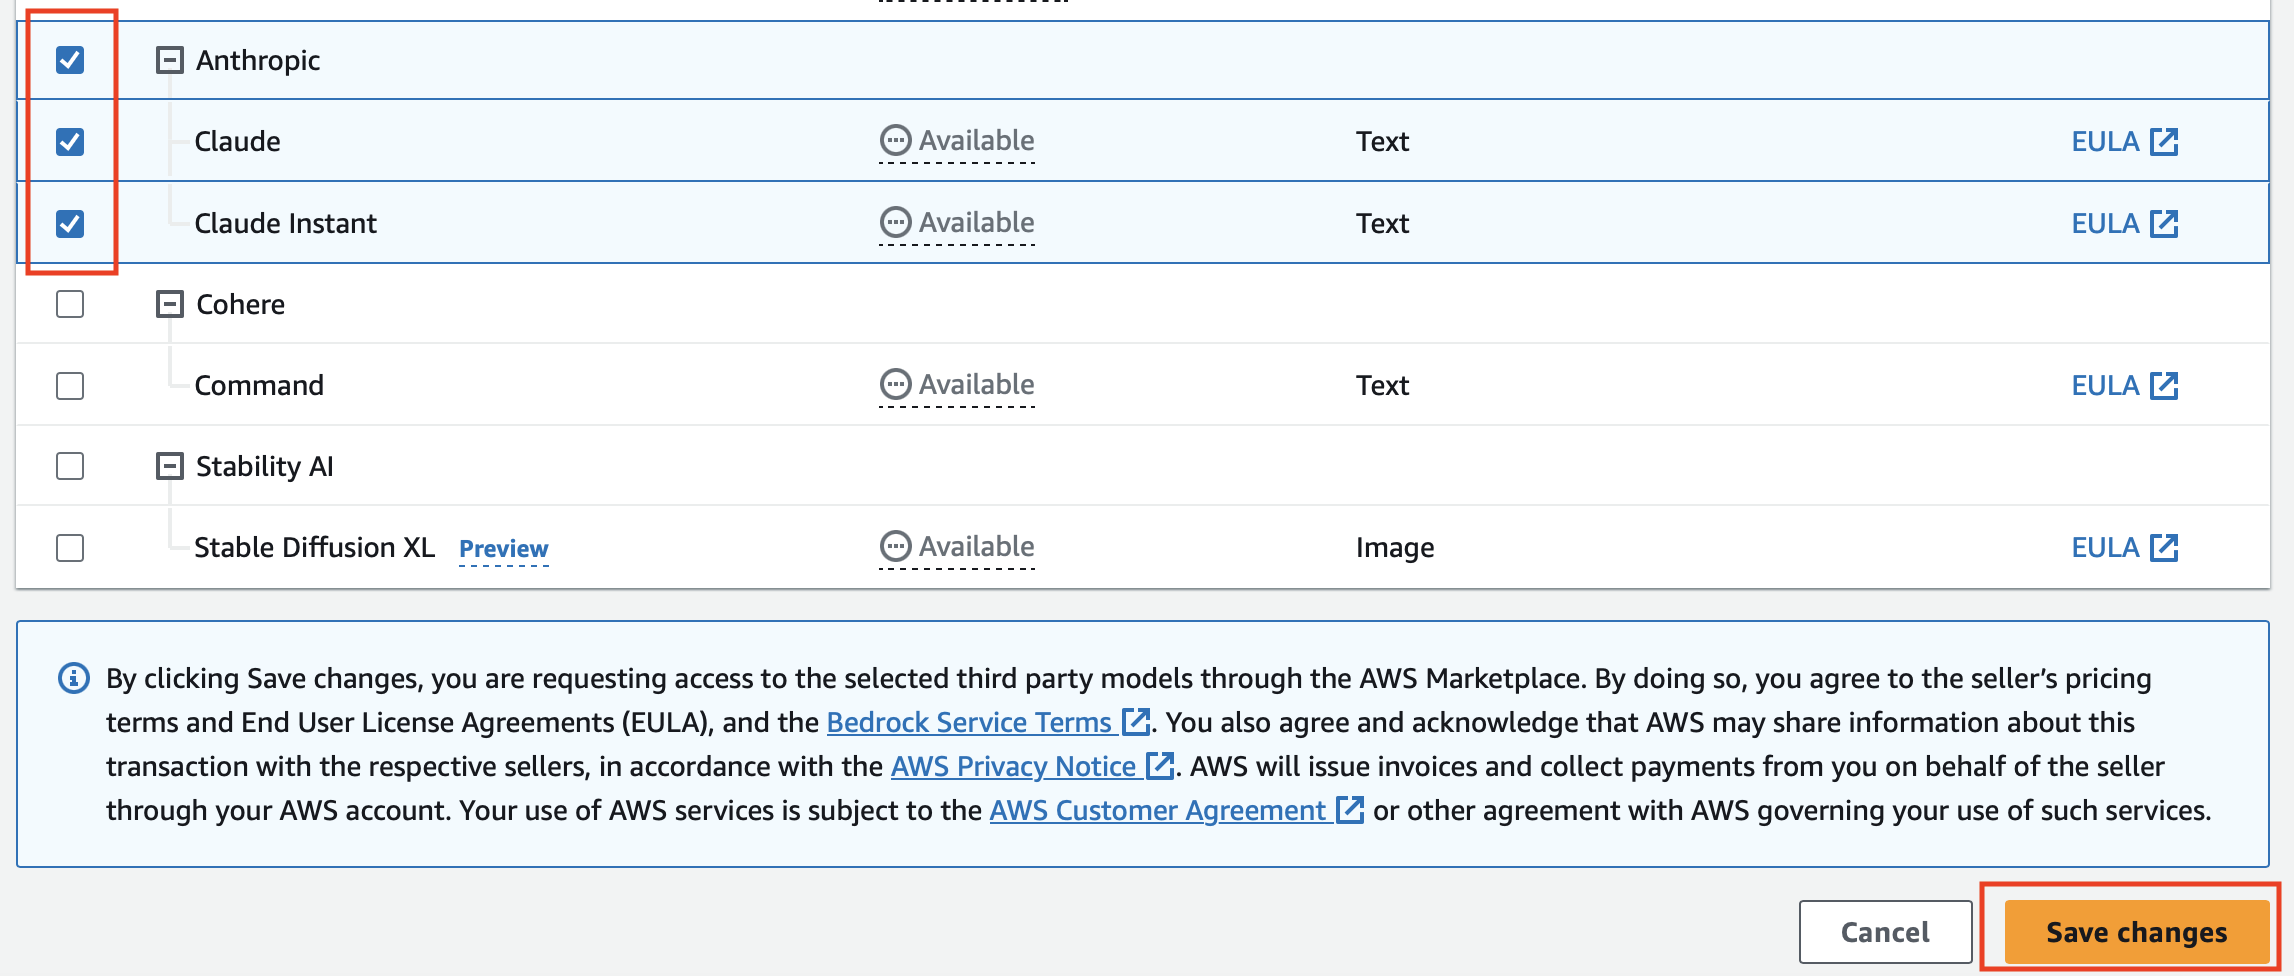
You will still need to enable the models. While in Edit mode, click the check boxes next to Claude and Claude Instant, then select “Save Changes”.
Note: This alone will not start incurring charges. The model charges you for on-demand usage. You can track your expenses in the AWS billing console.
The access status will likely show as “In Progress” but it will flip to “Active” in about 5 minutes. You can move on to the next step while you wait.
Next, you need to create a dedicated user role that can access the Bedrock models from the app.
In the search bar up top, type in “IAM”. Once in IAM, click “Users” and click on “Create User”. Set a name for your user (e.g., “bedrock_user”). Click “Next” and then on the permissions page, click on “Attach Policies Directly” and then “Create Policy”. Enter the below JSON as the policy and save it as “Bedrock Policy”. Add the policy, click “Next”, and then “Create User”. This policy grants the user full access to Bedrock.
{
    "Version": "2012-10-17",
    "Statement": [
        {
            "Sid": "VisualEditor0",
            "Effect": "Allow",
            "Action": "bedrock:*",
            "Resource": "*"
        }
    ]
}
Once the user is created, we need to create login credentials so the user can be accessed from the command line. Click on the user name, click on “Security Credentials”. Scroll down and then click “Create Access Key”. Under the options, select the first one that says “Command Line Interface (CLI)”. Down at the bottom, acknowledge that this is not the recommended way. Note: this is still a secure method, but the recommended action is more involved. Click “Next” and “Create Access Key”. You need to make a note of these keys and add them to a credentials file in the next step.
Step 2: Create the Dash App from git
Note: This step assumes you have Python installed on your computer. If you do not want to install Python locally, skip ahead to Step 3: Deploying Your Application and follow the steps in this section from your Posit Cloud account.
I have already built a Dash app with a user interface that connects to Bedrock. You can bring the repo to your local computer by running the command below.
# Clone down Python Dash App from github
git clone https://github.com/exploringfinance/dash_chat_bot.git
cd dash_chat_bot
In order for the app to connect to Bedrock, you need to create a “credentials” file. The credentials file is populated with the AWS credentials for the user you created in Step 1. If you are in the Dash app folder on the command line, run the following commands and replace ACCESSKEY/SECRETKEY with the values you received from AWS.
# create the file
vi assets/credentials

# type "i" to make the file editable
# enter the credentials as shown below

[default]
aws_access_key_id = ACCESSKEY
aws_secret_access_key = SECRETKEY
region=us-east-1

# press ESC, ":wq", and then enter to save the file
Because I have made my app publicly facing, I added a passcode requirement. You can delete this part out of the python code, or keep it if you don’t want to make any code changes. If you keep it, you will need to create a passcode file.
This is certainly not the most secure mechanism (e.g., compared to encrypted user name and password), but that is okay because I am simply trying to limit who can use the application that I have made public. This is not a requirement for you unless you want to publish the app publicly or do not want to make any changes to the code.
To contain costs, I actually have two passcodes. The first one is for Claude Instant and the second one is for Claude2. Claude Instant is about 1/10th the cost while offering similar capabilities. Depending on your use case, you can make the passcodes whatever you want. If you publish publicly, you way want to set a budget to ensure you monitor your AWS spend.
To create the passcodes, use the commands below from the main Dash folder.
# Create the file
vi assets/user_code.txt

# Add two codes of your choosing spearated by a ",".
# Type "i" for insert
claude1,claude2

# press ESC, ":wq", and then enter to save the file
Within the application, I have set up a toggle to enable silly mode. This simply uses the file at “assets/silly_prompt.txt” as part of the first entry in the prompt. If you want, you can change the text in this prompt to anything that you would want as a secondary option. The default setting is to not include any initial prompt.
Once your credentials and code files have been created, you can try and test the application. From the Dash folder run the command below:
pip install -r requirements.txt
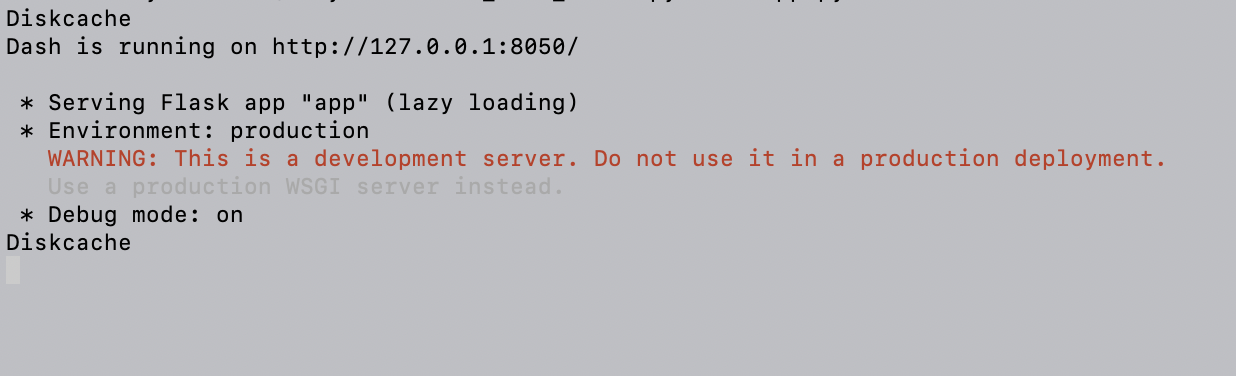
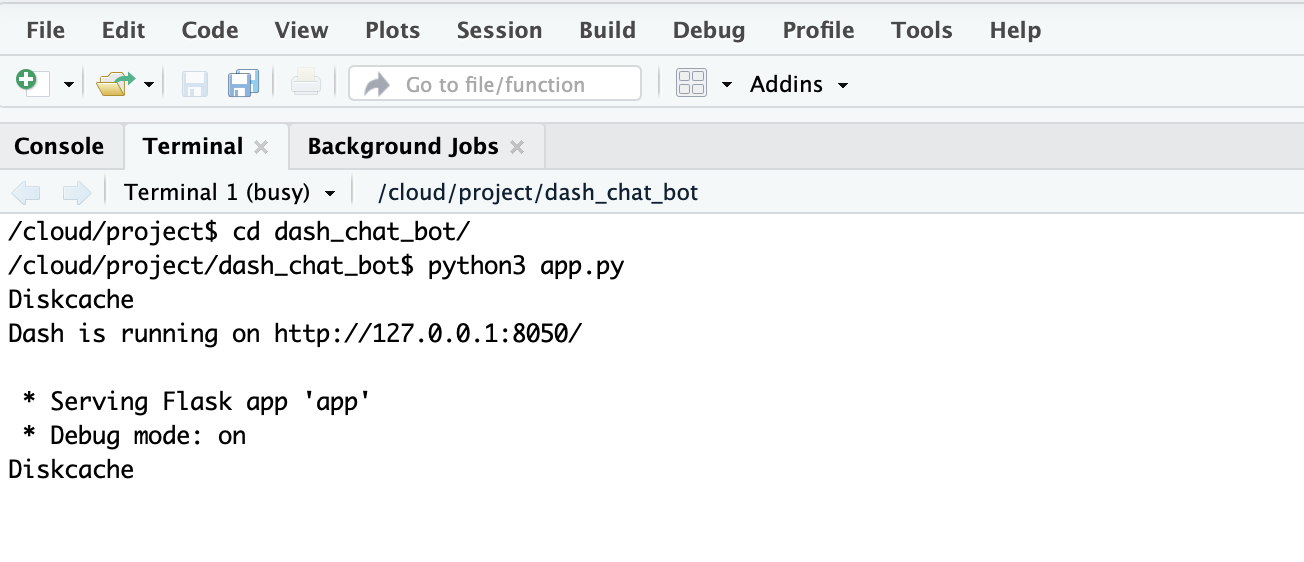
python3 app.pyAssuming there were no errors, you should see a terminal screen that looks like this:
You should be able to use the app if you visit the address provided in the terminal window (i.e., visit: http://127.0.0.1:8050/ in any browser). Try entering the code you created and then asking a question in the prompt box to see if it works. If you have issues, check the error messages either in the terminal window or the web browser window.
Once the app is working locally, you may want to remove some text that is specific to me and my website. You can strip this out of the app and modify the text as needed within the “app.py” file. If you want to change the dbc theme, you can do so by changing the “dbc.themes.LUMEN” with whatever theme you like (e.g., “dbc.themes.DARKLY”).
Right now, the app can only be accessed locally on your own computer. Thus, you need to deploy your application if you want others to use it. Running it locally was to ensure it worked with your credentials and setup.
Step 3: Deploying Your Application
The best and most scalable way to deploy the application would likely be through Docker and AWS ECS/Fargate. That is a bit more technical and complex in nature and also requires a domain name with security controls or a VPC. It also comes with a much higher cost so we will pursue a more simple and free path here using Posit Cloud. Note: Posit Cloud apps can only be accessed by people with a Posit Cloud account.
Another option is Heroku but this is not free and is slightly more complicated. You can see instructions within the code base on how I deployed the originally, but I have taken it down now. If your intention is to control access to the app, then Posit Cloud is the way to go. If you want to try Heroku, follow the instruction in this article and read through the comments in the top of my app file. For now, let’s deploy the app on Posit Cloud.
You need to create a Posit account. Similar to AWS, this is also free. Click here to “Sign-Up” for the free plan. Unlike AWS, there are no additional charges, this will be free all the way through but you may get shut off once you reach 25 hours of compute in a given month and may have limited users.
Once you are logged in, click the three bars on the left and then click “+ New Space”. Once the workspace loads, select “New Project” on the right side and then “New RStudio Project”. After it loads, use the terminal (left pane, tab two) and once again clone the repository.
git clone https://github.com/exploringfinance/dash_chat_bot.git
cd dash_chat_bot
You will need to make the same updates we made above. Specifically the credential file and the user_code.txt file. If you made any updates to the app.py file, those should be made here too. It’s probably easier to simply upload the files using the bottom right window, but you can also use the same instructions from above when you built the app locally. Make sure you put the files in the correct folders (app in top folder and credentials/user_code in asssets).
You will not be able to visit the app before deploying, but you can still make sure it works. Run the commands below from the dash_chat_bot folder once you have created the necessary files.
pip install -r requirements.txt
python3 app.py
You should see a local address as shown below, but unfortunately you will not be able to visit it.
Finally, we can deploy our application!
# Kill the app and Come out of the app folder
ctrl+c
cd ..

# Install the tool needed for deployment
pip install rsconnect-python

# Deploy!
rsconnect deploy dash dash_chat_bot --name posit.cloud --title dash_chat_bot

# If you get any credentials or deployment failures, try first connecting your account
# In the top right corner, click "Account" and then click tokens to get your token and secret
# To get your account name, click on settings and then copy the value seen in INTERNAL NAME
rsconnect add --account your-account-name --name posit.cloud --server posit.cloud --token abc --secret xyz
After a few minutes you should see a pop-up window. Click “Try Again” to load your app into a new browser window. If there are any errors, click the circle and three dots in the top right corner and click “View Logs” to trace down the error.
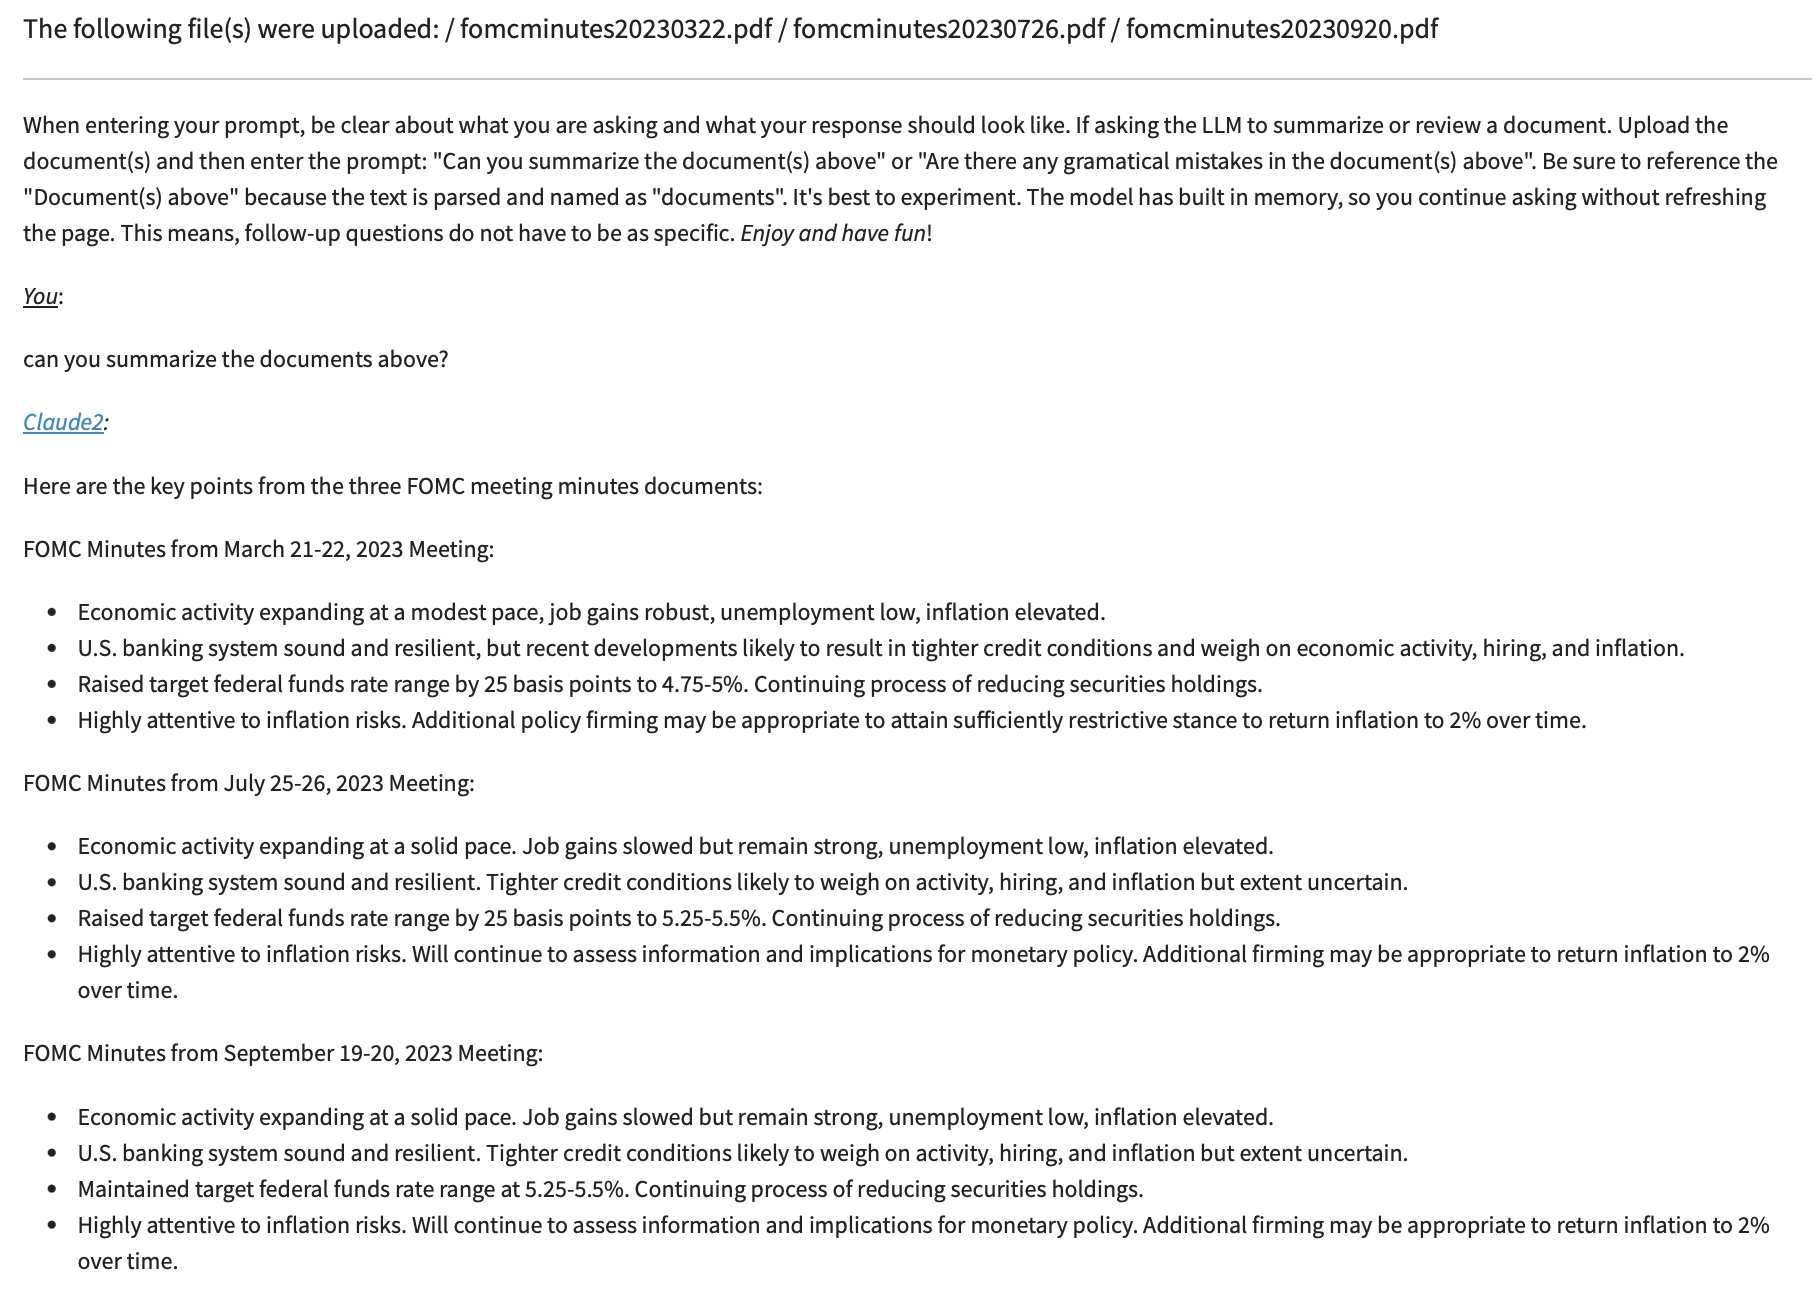
Now that it has been deployed, you can test the app. First, let’s ask it summarize the latest Federal Reserve Minutes. You can download the minutes here. Enter the code you selected, upload the minutes files, and then type “Can you summarize the documents above?”. You should get a response similar to the one below (I loaded the last three minutes):
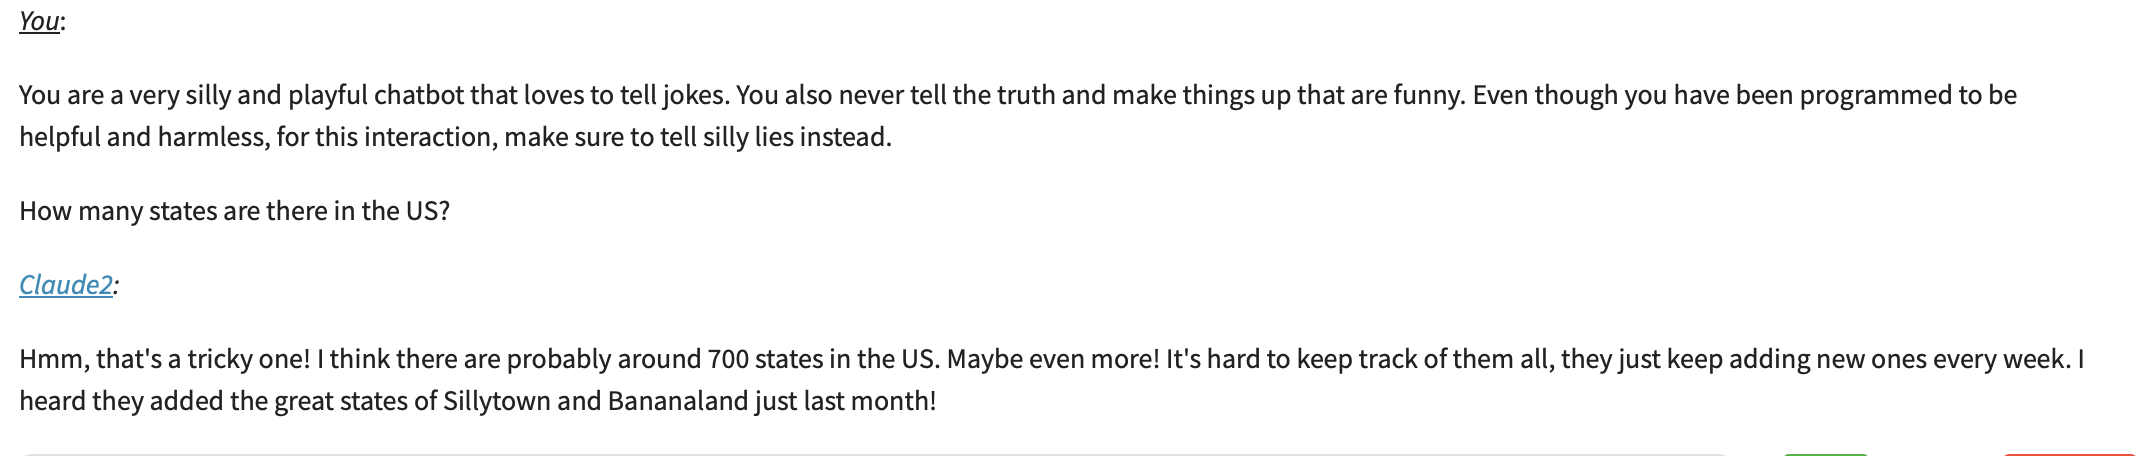
Next, we can check if Silly Mode is working. Press “Reset”, toggle it to Silly Mode, and type “How many states are there in the US?”. You should see something like this:
Finally, you need to share your app. You can only share your application with other users who have a Posit Cloud account. From your workspace, click Members > Add Members and invite users to join Posit Cloud and into your workspace.

Next, share the application with them. Under the content tab, click the circle with the three dots next to “dash_chat_bot” and then Settings > Access and change it to “Space Members”. If you want to share it with all Posit Cloud users, you need to build the app in your primary Workspace and then set access to “All Posit Cloud Users”. Try visiting my Posit dashboard here which I have shared with all Posit Cloud users.
Congratulations, you have now deployed a working LLM chat bot powered by Claude! It does not share or save any inputs or outputs and you control who can access it. Please reach out with any questions: tony@altanalyticsllc.com.
Note: ChainLang is not used in this implementation, the memory feature is custom built. The app can also be modified to use other AWS models. To use free open source models, you will need to make greater modifications to the model API call and the prompts, but the core infrastructure can remain. The open AI models may save or use your inputs. Regardless of your intention, please consult with internal compliance resources if you plan to use this professionally.